VPS Evangelism and Building LLM-over-DNS
My most valuable skill as a hacker/entrepreneur is that I’m confident deploying arbitrary programs that work locally to the internet. Sounds simple, but it’s really the core of what got me into Y-Combinator and later helped me raise a seed round.
Being on the Struggle Bus Early
When I was starting out hacking as a kid, one of the first complete things I built was a weather reply bot for Twitter. It read from the firehouse API, monitored for mentions and city names, then replied with current weather conditions when it got @‘ed. My parents got me a Raspberry Pi for Christmas and I found a tutorial online. I got it working locally and then got completely stuck on deployment.
The obvious next step was using my Pi as a server, but that was a disaster. My program had bugs and would crash while I was away. Then I couldn’t SSH back in because my house didn’t have a static IP and Tailscale wasn’t a thing yet. It only worked on and off when I was home and could babysit it.
Skipping Straight to PaaS Hell
When I started building web applications, I somehow skipped VPS entirely and went straight to Platform as a Service Solutions like Vercel and Render. I have no idea why. I was googling “how do I deploy my create react app” and somehow the top answer was to deploy to some third-party service that handled build steps, managed SSL, and was incredibly complicated and time-consuming.
There was always some weird limitation: memory constraints during build, Puppeteer couldn’t run because they didn’t have the right apt packages. Then I was stuck configuring Docker images, and since AI wasn’t a thing yet and I’d never used Docker at a real job, it was all a disaster. I wasted more time trying to deploy my crappy React slop than building it.
Getting Saved by a VPS Maximalist
During college, I got lucky and met a hacky startup entrepreneur who was hiring. I decided to take a chance and join, even though the whole operation seemed barely legitimate.
Going into the job, I had this assumption that the “right” way to deploy was on AWS or some other hyperscaler. But this guy’s mindset was the complete opposite—he was a VPS maximalist with a beautifully simple philosophy: rent a VPS, SSH in, do the same thing you did locally (yarn dev or whatever), throw up a reverse proxy, and call it a day. I watched him deploy like this over and over, and eventually he walked me through it myself a few times.
It was all so small and easy to learn, but it made me exponentially more confident as a builder. I never directly thought, “I can’t build this because I won’t be able to deploy it,” but the general insecurity definitely caused a hesitancy and procrastination that immediately went away.
Paying It Forward
I’ve become an evangelist for this approach and wanted to write about it for a long time, but didn’t know how to frame it entertainingly. Then on X, I got inspiration when levelsio posted a tweet about deploying a DNS server on Hetzner that lets you talk to an LLM.
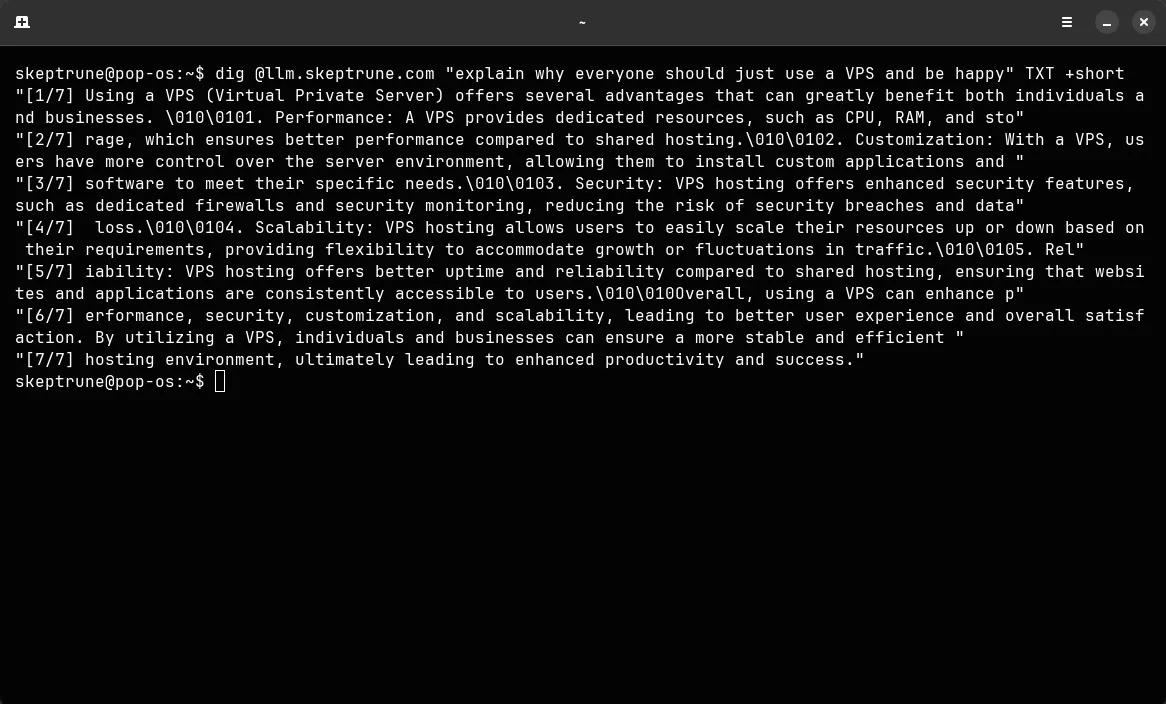
Want to see it in action? Try this:
dig @llm.skeptrune.com "what is the meaning of life?" TXT +shortGetting that setup is probably more interesting than my rambling, so here’s how to deploy your own LLM-over-DNS proxy on a VPS in less than half an hour with nothing other than a rented server.
Step 1: Access Your VPS
After purchasing your VPS, you’ll receive an IP address and login credentials (usually via email). Connect to your server:
ssh root@<your-vps-ip>Replace <your-vps-ip> with your actual server IP address.
Step 2: Clear Existing DNS Services
Many VPS images come with systemd-resolved or bind9 pre-installed. To avoid conflicts, remove or disable them:
# Check for running DNS services
systemctl list-units --type=service | grep -E 'bind|dns|systemd-resolved'

# Stop and disable systemd-resolved (if present)
systemctl stop systemd-resolved
systemctl disable systemd-resolved

# Remove bind9 (if present)
apt-get remove --purge bind9 -y
Step 3: Install Python Dependencies
Install the required Python packages for our DNS server:
pip install dnslib requestsStep 4: Create the DNS-to-LLM Proxy Script
Create a Python script that listens for DNS queries, treats the question as a prompt, sends it to the OpenRouter LLM API, and returns the response in a TXT record:
from dnslib.server import DNSServer, BaseResolver
from dnslib import RR, QTYPE, TXT
import requests
import codecs

OPENROUTER_API_KEY = ""  # Add your OpenRouter API key here
LLM_API_URL = "https://openrouter.ai/api/v1/chat/completions"

class LLMResolver(BaseResolver):
    def resolve(self, request, handler):
        qname = request.q.qname
        qtype = QTYPE[request.q.qtype]
        prompt = str(qname).rstrip('.')

        # Forward prompt to LLM
        try:
            response = requests.post(
                LLM_API_URL,
                headers={
                    "Authorization": f"Bearer {OPENROUTER_API_KEY}",
                    "Content-Type": "application/json"
                },
                json={
                    "model": "openai/gpt-3.5-turbo",
                    "messages": [{"role": "user", "content": prompt}]
                },
                timeout=10
            )
            response.raise_for_status()
            raw_answer = response.json()["choices"][0]["message"]["content"]
        except Exception as e:
            raw_answer = f"Error: {str(e)}"

        try:
            answer = codecs.decode(raw_answer.encode('utf-8'), 'unicode_escape')
        except Exception:
            answer = raw_answer.replace('\\010', '\n').replace('\\n', '\n')

        reply = request.reply()
        if qtype == "TXT":
            # Split long responses into chunks of 200 chars (safe limit)
            chunk_size = 200
            if len(answer) > chunk_size:
                chunks = [answer[i:i+chunk_size] for i in range(0, len(answer), chunk_size)]
                for i, chunk in enumerate(chunks):
                    reply.add_answer(RR(qname, QTYPE.TXT, rdata=TXT(f"[{i+1}/{len(chunks)}] {chunk}")))
            else:
                reply.add_answer(RR(qname, QTYPE.TXT, rdata=TXT(answer)))
        return reply

if __name__ == "__main__":
    resolver = LLMResolver()
    server = DNSServer(resolver, port=53, address="0.0.0.0")
    server.start_thread()
    import time
    while True:
        time.sleep(1)
Save this as llm_dns.py on your VPS.
Before running, you need to set your OpenRouter API key. For this tutorial, you can paste it directly into the OPENROUTER_API_KEY variable. For anything more serious, you should use an environment variable to keep your key out of the code.
Security Note: This is a proof-of-concept. For production use, you’d want proper process management (systemd), logging, rate limiting, and to avoid storing API keys in plaintext.
Step 5: Run the DNS-LLM Proxy
Start the DNS server (port 53 requires root privileges):
sudo python3 llm_dns.pyStep 6: Test Your Service
From another machine, send a DNS TXT query to test your setup:
dig @<your-vps-ip> "what is the meaning of life" TXT +shortThe LLM’s response should appear in the output.
Troubleshooting
Common Issues:
Permission denied: Make sure you’re running withsudo(port 53 requires root)Connection timeout: Check your VPS firewall settings and ensure port 53 is openAPI errors: Verify your OpenRouter API key and check your account has creditsNo response: Try runningsystemctl status systemd-resolvedto ensure it’s actually disabled
Step 7: Secure Your Setup (Optional but Recommended)
To restrict access to your DNS-LLM proxy, use UFW (Uncomplicated Firewall) - and yes, it’s literally called “uncomplicated” because that’s what a VPS is, uncomplicated:
ufw allow ssh
ufw allow 53
ufw enable
This allows SSH access (so you don’t lock yourself out) and DNS queries on port 53, while blocking everything else by default.
Important: This setup runs as root and stores your API key in plaintext. For anything beyond experimentation, consider using environment variables, proper user accounts, and process managers like systemd.
References
That’s it! You now have your own LLM-over-DNS proxy running on a simple VPS. No complex infrastructure needed - just SSH, install dependencies, and run your code. This is the beauty of keeping things simple.